

Archive for 2013
The Cyogenmod Installer Easily Install Cyogenmod on your Android Device
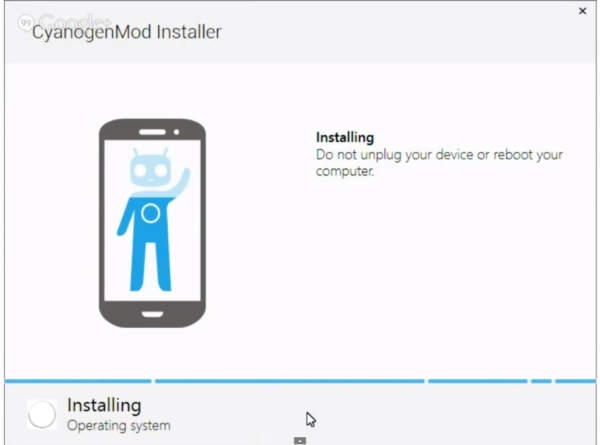
The CyanogenMod team has
now released their newest app - CyanogenMod Installer. This automates the
process needed to install the custom ROM on your Android device. You also need
software on your PC as well to get CM installed on your phone or tablet. the process is very easy but unfortunately Currently it is compatible with some of the android devices listed below in the link but good news is these guys constantly updating their list of compatible devices so watch for your device in the list and install Cyogenmod on your android device.
Supported Devices:
http://goo.gl/EL4hY7
CyanogenMod Installer Android App and PC software:
http://qbking77.com/?p=2706
CyanogenMod Inc. What the future holds:
http://goo.gl/fNLrEB
Transform your S4 into Note 3 with PhoeniX ROM V10.1 (Android 4.3 with Note 3 Features!)
Why waste money to buy Note 3 if u can transform your S4 and get the exact same features?
With so many ROMs out there, its refreshing to see something truly revolutionary.

I don't own this ROM. I've tried almost every ROM and this is the best ROM out there.

Based on the lastest stock firmware: Android 4.3 XXUEMK8 (build date: 21/11/2013)
With so many ROMs out there, its refreshing to see something truly revolutionary.
I don't own this ROM. I've tried almost every ROM and this is the best ROM out there.
I am not responsible for any damaged caused to your device while using this ROM
Based on the lastest stock firmware: Android 4.3 XXUEMK8 (build date: 21/11/2013)
Perseus 14.1 kernel - Thanks to AndreiLux his thread
Fully Deodexed
Added latest BusyBox
Added latest SuperSU+Bin files
Added Flashplayer support (Note: Flash doesn't work on stock browser, use dolphin or something.)
Updated all stock apps to their latest version(Gmail, Google search, Google Maps ,Play store etc.)
Unique PhoeniX bootanimation & shutdown animation - Huge thank to the artist anbech
Mods:
- Call Recorder
- Hacked Stock Email App
- Sysro & sysrw support
- Enabled touchwiz wallpaper scrolling
- Disabled scrolling cache
- Phone with no increasing ringtone
- All supported languages enabled
- All supported languages for Samsung Keyboard enabled
- Enabled init.d scripts
- Shutter Sound menu Enabled to stock camera
- Big APN list
- Enable sub Symbols on Stock Samsung keyboard
- Added exit menu to stock web browser
- Dialer search matches numbers in contacts and call logs along with contacts
- data/app enabled
- NFC Hack - You can use your NFC while the screen is off, and at lockscreen.
- 4 ways to reboot menu - Extended power menu
- Enable call button in contact list
- Disabled Converting Effect Between SMS MMS
- Automatic SMS encoding (Arabic and other utf-8 encoding support)
- Automatic efs backup when flashing the rom.
- Added ES File Explorer.
- Ported alot of Note 3 Features! This is the first ROM of S4 with that!!:
- Note 3 Launcher With PullUp App Chooser (Can be changed in PhoeniX Extra!)
- Note 3 My Magazine
- Note 3 Multiwindow with the following features:
* Quad screen: you can split multiwindow up to 4 different apps!
* Floating windows: Like Pen Window, just with the finger (single click on the app will open popup window)
* Note 3 Drag & Drop Multiwindow feature
* Abillity to open same app from this list(If you need any more app please make a list so I can add in the next release) :- New Note 3 Lockscreen effect - Watercolor effect! Now you have 3 options:Code:com.sec.chaton com.sec.android.app.myfiles com.google.android.talk com.google.android.youtube com.infraware.polarisviewer4 com.infraware.polarisoffice4 com.whatsapp com.kakao.talk com.sec.android.app.sbrowser com.android.email com.android.mms com.android.chrome com.facebook.katana com.google.android.gm com.google.android.videos com.twitter.android com.quoord.tapatalkpro.activity com.sec.android.app.videoplayer com.estrongs.android.pop
* Watercolor Effect
* Ripple Effect
* Flare Effect
- New Settings Option - From now you have Search option in settings!! Exactly like in the Note 3!
- Note 3 Phone with Popup Incoming Call Notifications! - MultiWindow Manager New Edition - thanks to BJB, Inc.
- Added Official OmegaDroid Android News app - I am reporter and editor there, so if you want to read the best news about android, use this!
- Added TB Restore Fixer Stub by -viperboy- his thread
- LMT Launcher that offers a pie control like nexus, and gestures. Thanks to noname81 his thread.
- Exclusive! Only to PhoeniX ROM!:
* RTL Menus when you select Arabic/Hebrew as your default language.
* New Amazing Wallpapers in Wallpaper Chooser Wallpapers! Beautiful Wallpapers! How to use? Click on Menu-> Set Wallpaper-> Home/Lock/Both-> Wallpaper Picker/chooser-> Select your Wallpaper!
* New Settings app: Huge thank to ficeto! - PhoeniX Settings App includes the following features:Samsung Secret CodesFast DormancyFaster Fix GPSCSC SelectCPU Spy PlusBattery ChooserTerminal EmulatorXposed +ModulesIdle Wifi Time ManagerLogcatOS MonitorPhoeniX OTA Center - now you can update the rom without plugin into the computer!
The downloads will be save on the internel SD card(if you use my memory script so it will be saved in the externel sd card) undr the folder OTA updates.
Reboot options - Normal, Recovery, Download.
Xposed support. Huge thanks to rovo89 his thread.
Xposed Modules:
Wanam Xposed - Special thanks to wanam his thread
Nottach Xposed - Special thanks to Nottach his thread
DPI Settings - thanks to rovo89
|
How To UnBrick Samsung Galaxy S 4g (Only for T959v) Guide
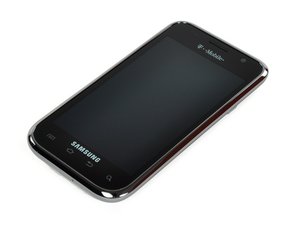
This Guide also is applicable when your phone is not going to custom recovery
FiX Information:
Mod Type:: ROM
Difficulty:: Easy
Mod Base:: TouchWiz (Samsung)
Mod Status:: Stable
Apply In:: ODIN/Heimdall
Carrier:: T-Mobile
Optional:: Includes Recovery
Requires Root:: No
Android Version:: 2.3.X (GB)
Source::
Another Team Acid release
NOTES
* The KC1 and KJ6 files contain bootloaders for the SGH-T959V. By downloading and flashing the files you agree that you will not hold me or anyone in Team Acid responsible if your device gets bricked. There are always risks when flashing custom firmware and ROMs onto your phone.
* As always, make a full backup of your SD card and phone.
FEATURES
* Root
* CWM + drhonk's custom KJ1 kernel preinstalled.
* Gets rid of the disappearing apps problem
* Gets rid of the missing SD card once you're booted into GB
* Gets rid of your bootloops
* Get a working GB ROM with ext4 support (includes Official KJ6 with drhonk's custom KJ1 + cwm kernel)
* All the files you need are included in this post
* Wipes out all the gremlins you had on your phone by putting the KC1 bootloaders, then the KJ6 bootloaders on your phone.
PREREQUISITES
1) Download all the files from the links on this post, and extract both .7z files and Odin v1.85 using 7-zip or a compatible program
2) Leave the phone's back cover off since you're gonna have to do a few battery pulls and you need access to the sd card
3) Format your sd card by hooking it up to your computer with an sd adapter or through mass storage mode using your phone and a USB cable.
FORMATTING ERASES EVERYTHING ON YOUR SD CARD. MAKE SURE YOU BACK IT UP ONTO YOUR COMPUTER BEFORE YOU DO THIS.
Follow this guide to format your sd card on Windows (this is on XP but the same steps can be taken on Vista or 7).
This guide is meant for using your sd card on a Wii, but the process is the same to get it working on the phone.
WATCH THE VIDEO ALL THE WAY TROUGH BEFORE ATTEMPTING ANY OF THIS.
INSTRUCTIONS
1) After formatting the SD card with the steps above, put your favorite GB ROM, and install_busybox.zip onto the SD card
- 1a) You can restore any backup of your SD card you made at this point. Make sure you have at least 2GB free on the card though!
2) Put your phone into download mode for guide to how to put your phone in download mode Click here
3) Open Odin on your computer
4) Load up Odin, and load the KC1 files, DON'T TOUCH ANY OTHER OPTIONS, leave them like they are even if Odin changes them!
- 4a) PIT: Sgs4g.pit
- 4b) PDA: pda.tar.md5
5) Flash and let the phone reboot. Once you see the T-Mo startup screen (the pink one), OR the CWM (red text) screen do a battery pull.
6) Put your phone back into download mode
7) Click reset in Odin, now load up the KJ6 files
- 7a) PDA: pda.tar.md5
- 7b) CSC: csc.tar.md5
8) Flash the files and let the phone reboot.
- 8a) The phone will go into standard recovery (blue and yellow letters, you might hear Linda) and then reboot itself once.
- 8b) The 2nd time you will see either the CWM red letter screen or the Galaxy S 4G white letters/pink splash screen and if you prefer you can let the phone boot all the way, do a battery pull.
9) Now unplug the USB cable, put the battery back in, hold vol + and -, then press power. You should boot into CWM (red letters, voodoo).
10) Go into the voodoo menu > enable lagfix and /system lagfix on
11) Flash the GB rom you put on your sd card
12) Flash the busybox_installer.zip
13) Reboot and hear Linda give her speech.
14) Welcome to GB with ext4!
Download Links:
7-zip
Odin 3 1.85
Install_busybox
fb_kc1_bootloaders_cwm.7z
fb_kj6_official_kj1_kernel.7z
CREDITS:
Team Acid
Rameez Uddin
How To root htc amaze 4g T-mobile
- Install HTC Drivers
- Get Token ID. Buttons have been replaced and include links.
- Unlock Bootloader (Must place Unlock_code.bin in the folder)
- Install Recoveries
- 4EXT (Latest version as of 10-29-2012)
- TWRP 2.3.3.0
- User Provided Recovery
- User Provided Kernel
Here is a screenshot.

How To Use. THIS IS FOR THE PC ONLY. No plans ever for Mac or Linux. Sorry.
1. Download the toolkit DO NOT RENAME THE FOLDER
2. Download Winrar from here. Install it after you download it
3. Extract the folder anywhere.
4. Run the program.
How to use Hasson2000's tool kit
Credits: Hasson 2000
How To Root Htc Droid DNA

Here is a complete guide for anyone interested in rooting the HTC Droid DNA. The insecure boot image, TWRP recovery, CWM recovery and SuperSU files used in this guide are not my own developments, and their developers have been credited in the end of this post.
I am only writing this as a newbie-friendly guide for everyone, and am providing my own SuperSU, su and busybox installer zip file that includes everything you need for full root.
- Unlock the bootloader of your device by visiting the HTC bootloader unlock page. Warning: This will wipe your data.
UPDATE: Thanks to Verizon, the official bootloader unlocking method mentioned above no longer works. Please refer to this method for unlocking the bootloader. - Download ClockworkMod or TWRP recovery for the device and rename it to recovery.img (or keep the existing name and change recovery.img in the command below to that name).
- Download the SuperSU and busybox package and put it on your SD card.
- Put your phone into bootloader mode and connect it to your PC via USB.
- On your computer, make sure you are in the folder where you downloaded the recovery file and use this command to flash the recovery:Code:
fastboot flash recovery recovery.img - Finally, reboot your device into recovery, flash the SuperSU and busybox package and reboot your device.
You should now have root access.
How To Root HTC ONE Windows/Mac/Linux

Before we begin, MAKE
A BACKUP of EVERYTHING on your HTC One internal storage by copying the
everything to your hard drive! (For Mac, please install Android File Transfer, which will allow you to connect your HTC One as a disk drive.)
Step 1. First, go to Settings->Developer
options and make sure USB debugging is checked ON.
Step 2. Connect a micro-USB cable from your HTC One to your
computer.
Step 3. Download HTCOneRoot.zip and unzip to HTCOneRoot
directory. This zip file contains everything you need to root your HTC
One!
Download HTCOneRoot.zip (For Windows, Mac, and
Linux)
If you have Mac or Linux, no driver is needed. For Windows
users, if you don’t have HTC drivers installed, run the HTCDriver_4.1.0.001.exe file
to install drivers.
If drivers are installed correctly, you should see “My HTC” or
something similar like “ADB Interface” in Device Manager for Windows.
Step 4. Open a command prompt/terminal on your computer and
type:
For Windows:
cd Downloadscd HTCOneRootadb backup -apk -all -f backup.ab
For Mac:
cd Downloadscd HTCOneRootchmod 755 *./adb-mac backup -apk -all -f
backup.ab
For Linux:
cd Downloadschmod 755 *cd HTCOneRoot./adb-linux backup -apk -all -f
backup.ab
Step 5. Go to your phone and choose “Backup up my data”.
This will back up all of your app and app data.
Step 6. Once app backup is done, go to Settings->Power and
make sure Fast
boot is checked OFF.
Step 7. Turn off your HTC One. Then hold down Volume Down
and Power buttons together for about 3-5 seconds until you see bootloader menu.
Hit the Power button to enter Fastboot mode.
Connect micro-USB cable from your HTC One to your computer.
Step 8. Type the following in your command prompt/terminal:
For Windows:
fastboot oem
get_identifier_token
For Mac:
./fastboot-mac oem
get_identifier_token
For Linux:
sudo ./fastboot-linux oem
get_identifier_token
Step 9. Copy the identifier token you get exactly as shown below
(or see video tutorial).
Step 10. Go to HTCDev.com and log-in. If you don’t have an
account, register then log-in.
Click on “Unlock Bootloader” then “Get Started”.
Step 11. Choose “All Other Supported Models” then click on
“Begin Unlock Bootloader”.
Step 12. Choose “Yes”.
Step 13. Make sure check boxes are checked ON and click on
“Proceed to Unlock Instructions”.
Step 14. Scroll all the way to the bottom and click on “Proceed
to Step 5″.
Step 15. Scroll all the way to the bottom and click on
“Proceed to Step 8″.
Step 16. Scroll all the way to the bottom and paste your token
you copied over earlier. Make sure there’s no white spaces or INFO (if
using MAC/Linux).
Step 17. Hit “Submit” and if you copied and pasted the token
correctly, you should get a success message.
Step 18. Check your e-mail and you should have received Unlock_code.bin file
from HTC.com.
Step 19. Download and copy the Unlock_code.bin file
to the HTCOneRoot folder.
Step 20. Next type in command prompt/terminal:
For Windows, type:
fastboot flash unlocktoken
Unlock_code.bin
For Mac, type:
./fastboot-mac flash
unlocktoken Unlock_code.bin
For Linux, type:
sudo ./fastboot-linux flash
unlocktoken Unlock_code.bin
Step 21. Go to your phone and choose “Yes” using Volume Up
button then hit the Power button. Your HTC One will reboot in about 5
seconds.
Step 22. Once rebooted, your HTC One should be completely wiped
and you should get Welcome message just like the day you got your phone.
Sign in through the setup process then copy the CWM-SuperSU-v1.30.zip file
in HTCOneRoot folder to anywhere on your HTC One’s internal storage.
*Note – For Android 4.3 or 4.4, please use the file
“UPDATE-SuperSU-v1.65.zip” instead of v1.30.
Step 23. Power off your phone then re-boot into bootloader menu
to fastboot mode like you did in Step 7.
Step 24. Type the following to install recovery:
For HTC One M7
(AT&T/T-Mobile/International/Unlocked/Developer)
fastboot flash
recovery openrecovery-twrp-2.6.3.0-m7.img
For HTC One M7WLS (Sprint):
fastboot flash
recovery openrecovery-twrp-2.6.3.0-m7wls.img
Then Type:
fastboot erase cache
For Mac, replace “fastboot” with “./fastboot-mac”.
For Linux, replace “fastboot” with “sudo ./fastboot-linux”.
Step 25. Choose “Bootloader” and hit the Power button.
Step 26. Choose “Recovery” and hit the Power button.
Step 27. Once in TWRP recovery, choose “Install”.
Step 28. Choose the file CWM-SuperSU-v1.30.zip.
*Note – For Android 4.3 or 4.4, please use the file
“UPDATE-SuperSU-v1.65.zip” instead.
Step 29. Swipe to flash this file. This will root your HTC
One by installing SuperSU superuser app and SU binaries.
Step 30. Choose “Reboot System” to reboot.
Step 31. Once rebooted, you will find “SuperSU” app in your app
drawer. Congratulations! You’ve successfully rooted your HTC One!
You can verify full root by installing a rooted app like Titanium Backup
app.
Step 32. Next, let’s restore your data. Go ahead and copy
all of your data (you backed up earlier) back into your HTC One’s internal
storage.
Then, go to Settings->Developer
options and make sure “USB debugging” is checked ON.
(You will have to do this again since your phone reseted itself when you
unlocked the bootloader) Connect micro-USB cable from your phone to your
computer.
Step 33. Next type the following to restore your app and app
data:
For Windows:
adb restore backup.ab
For Mac:
./adb-mac restore backup.ab
For Linux:
./adb-linux restore backup.ab
Step 34. Go to your phone and hit “Restore my data”.
Step 35. Your HTC One should now be fully rooted along with your
apps!
Step 36. HTC One stock firmwares are HARD TO FIND. So, my
suggestion is to make a backup ROM at this point. That will allow you to
easily unroot and restore stock firmware if something goes wrong or you want to
take your phone back for warranty.
You can do this easily by re-booting into TWRP recovery and
selecting “Backup”.
FAQ:
Q: Does this root method erase my data and personal files?
A: No, if you follow everything in this tutorial, you will be
able to root your HTC One, keep your data and personal files. So make
sure you follow every step!
Q: I cannot flash the TWRP recovery using fastboot!
A: Please see revised Step 24 on this page, the TWRP file has
been updated to the latest version!
Credits:


