
On Tuesday, 5 November 2013
Before we begin, make sure that you have battery charged over 60 % and have backed up all your important Contacts, Call Logs & Messages. It is highly recommended in case of any mishap or data loss to backup all your important data.
Method 2: For Android 4.0.x Ice Cream Sandwitch & Android 4.1.2 JellyBean (Recommended)
Since this method is not suitable for a device running on Android Gingerbread, you may not try this method if you have Android 2.3.x installed on your phone.
Enjoy!
- Download and Unzip Odin PC - Get it here
- Download & Install Samsung USB Drivers – Get here
- Download & Unzip Cf Auto Root Package file once on your desktop
- Download the Cf-Root (Root Package File) matching your baseband version from HERE.
- In order to check your Kernel version open Settings > About Phone > Kernel Version. See the Kernel Version number here and match it with the root packages available on the attached link above. Download your phone’s kernel’s rooting package file and unzip it once on the desktop of your computer.
- Put your phone in download mode. In order to do so turn it off first
of all by pulling out the batter, or by long pressing the power key.
Wait for 30 seconds and then press Home + Voume Down + Power Key simultaneously. It should now ask you for a warning, press the Volume Up key in order to continue.

- Open Odin and attach your phone to your PC using the original data cable.
- The ID:COM at the top left should turn blue or yellow depending upon your odin version as soon as your phone is detected.
- Click PDA tab in odin and select the extracted Cf Root package file, which you downloaded in step 4 above and extracted in step 1 in below.
- Click on Start button in odin. Make sure that the options selected in your odin are exactly as shown above. Your CF Root file will be a different one as the pic above is for Galaxy S4 (Just to give you an idea of odin it is attached here). The process is quite fast and it will flash a kernel in your phone in order to give it root access and install CWM recovery. As soon as it is finished, your phone will restart automatically. Disconnect it from the PC now and check that you have SuperSU installed in the apps.
Method 2: For Android 4.0.x Ice Cream Sandwitch & Android 4.1.2 JellyBean (Recommended)
Since this method is not suitable for a device running on Android Gingerbread, you may not try this method if you have Android 2.3.x installed on your phone.
- First of all you need to download the Rooting Package file for your phone’s Kernel Version
- Check your phone’s kernel version in Settings > About > Kernel version.
- Download the file for your device’s kernel below.
| Download for ICS – Android 4.0.x | Download for JB – Android 4.1.2 |
- If the file for your device’s Kernel version is not attached above, try finding it on the official thread HERE.
- Download the .zip file and place it on your phone’s sd card storage.
- Turn off your phone by holding the power button or by pulling out the battery, wait for 30 seconds and turn it on into recovery mode. In order to do so press Home + Volume Up + Power Key simultaneously. Your phone should show you the recovery menu now.
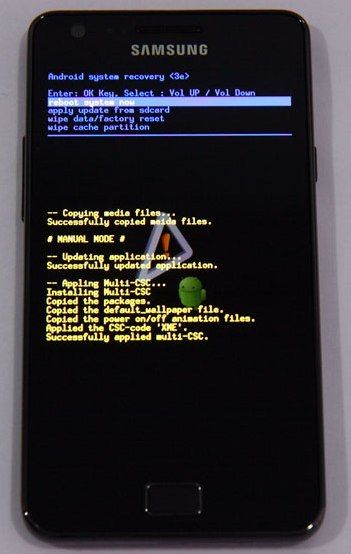
- You can move between the options here by pressing volume up and down keys, in order to make a selection press power or home key one of these will work.
- Here select install update from sd card and select the .zip file you placed on your phone’s sd card.
- Confirm the process by pressing yes in between a lot of nos and the .zip file should begin the installation.
- As soon as the installation is finished your phone will reboot.
Enjoy!


